
|
 |  |  |  |
| The Pie of Sauron: A Dekatron-Equipped Jack-O-Lantern | |
| Written by AnubisTTP on 2009-10-17 |
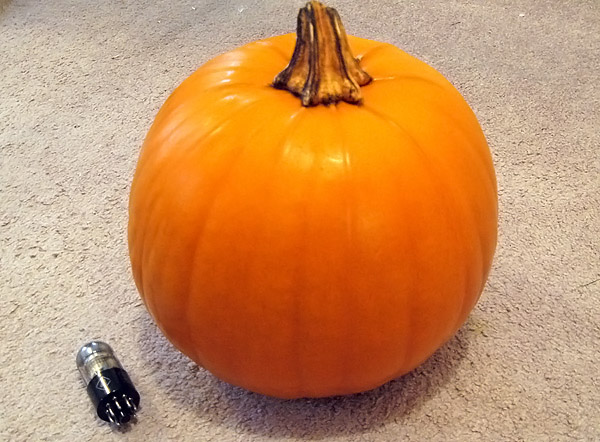
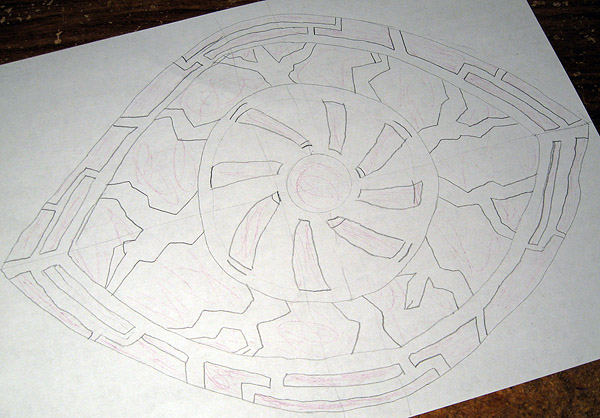
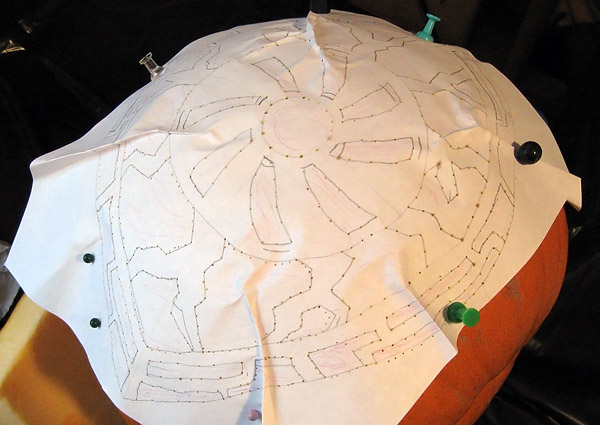
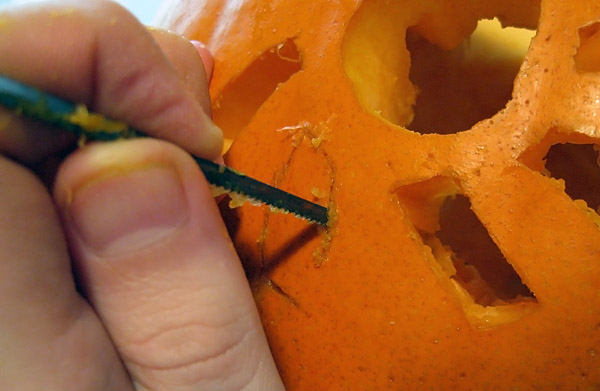
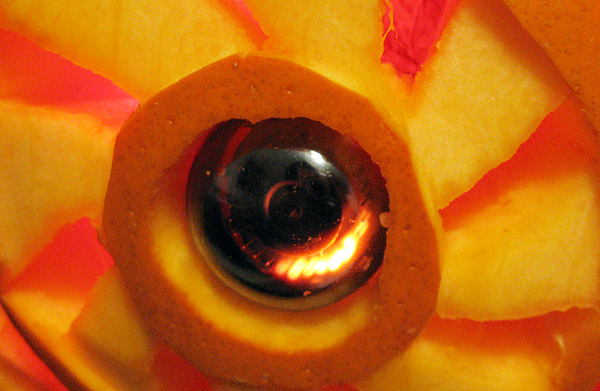
The Pie of Sauron is a electronically enhanced pumpkin using a 'dekatron' glow transfer counting tube and LEDs to create a spinning, eye-catching display. Is sticking a 400 volt glass counting tube into the front of a jack-o-lantern a concept fraught with peril? I'll leave that up to the arson investigator to decide, but regardless, it sure does look flashy. CARVING THE PUMPKIN Here is the unsuspecting victim, a medium-sized pumpkin from the local grocery store. Pick a pumpkin that is fairly round and has a nice clean face to put the carving on; every pumpkin will have one face that is cleaner than the other since pumpkins lay on their sides when they are growing. Draw out the image you are going to carve on a piece of paper, which will be transferred to the pumpkin later. Don't draw directly on the surface of the pumpkin, as cleaning up all the stray pencil or marker lines after you are done carving is very difficult. At this point I had already decided to install a dekatron in the completed jack-o-lantern, and when your electronic attractant is a round glass glowing tube, the choice to carve a gigantic eyeball design is practically mandatory. Now it's time to transfer the image to the face of the pumpkin. Pin the drawing onto the pumpkin's surface and pinch in the excess paper around the edges to make the image match the curve of the pumpkin's face. When you transfer the paper image to the pumpkin you will have to make a number of folds radiating outward from the center of your image like hands on a clock, try to keep this in mind when you are drawing the image. It is best to keep lines crossing the folds at a 90 degree angle to each fold so they will meet up correctly afterward. Once the paper is securely pinned to the surface of the pumpkin, use a straight pin to poke holes along all of the lines in your drawing, marking the places where you will cut in the next step. The big black-magic secret to carving good pumpkins is to use a coping saw blade instead of a knife to cut out all the pumpkin bits. Get a coping saw blade and break off the little pins on each end with a pair of pliers, then wrap duct tape around one end to act as a handle. Use this pumpkin-shiv to cut out all the bits from your drawing, using the holes you punched earlier as a guide. Don't worry about trying to eradicate every pinhole when you are cutting out the pieces--the holes will become practically invisible after a few hours of exposure to air. Here is the pumpkin after carving but before installation of the electronics. I used a very sharp knife to peel off the pumpkin's skin in select areas, allowing some of the light to shine through the pumpkin material. If you do this, be sure to outline the shapes of all the skinned sections with knife-cuts first, to prevent any accidental peeling of unintended areas. THE ELECTRONICS 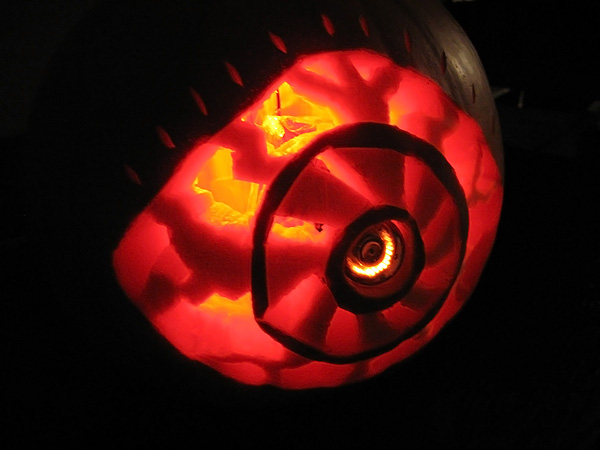
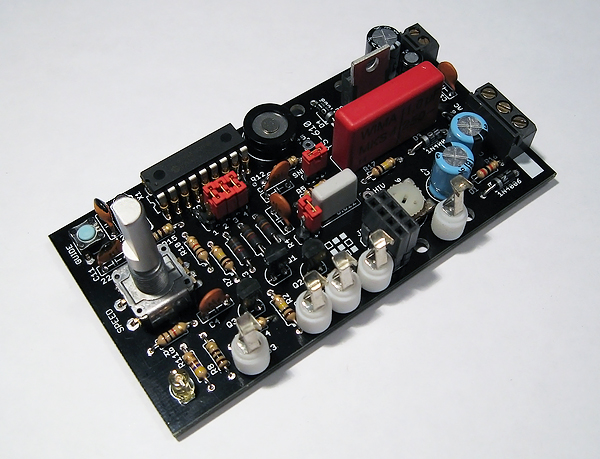
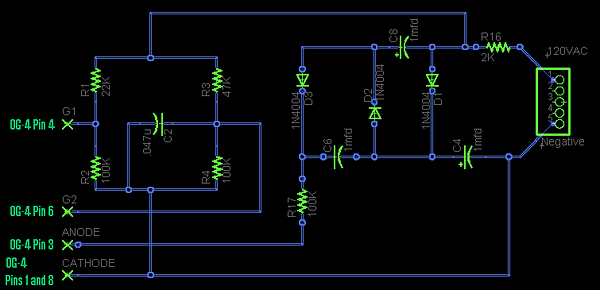
This simple 'spinner' circuit does not have a TTL-level interface or nifty sound effects like the YS-610, but it will spin a dekatron at a fixed speed with a very low number of components, using the 60hz line frequency as a timebase. Note that the 1ufd capacitors should be rated for at least 350 volts... this circuit is connected directly to 120 volt mains and will roast you pretty good if you are not careful. I have included labels for the pin hookups to run an OG-4 tube, the model of tube I used in this project. The OG-4 is a neon filled tube, which will produce an orange glow in operation. For a purple glow, replace the OG-4 with an OG-7 tube; these are more expensive, but are pin compatible with the OG-4 and can be inserted into the above circuit without modification. OG-4 and OG-7 tubes can both be bought on eBay in varying quantities for 10 - 20 dollars each. Avoid the temptation to use an OG-3 tube, these are quite cheap on Ebay but have a high failure rate and are difficult to get spinning with most of the circuits floating around the web.
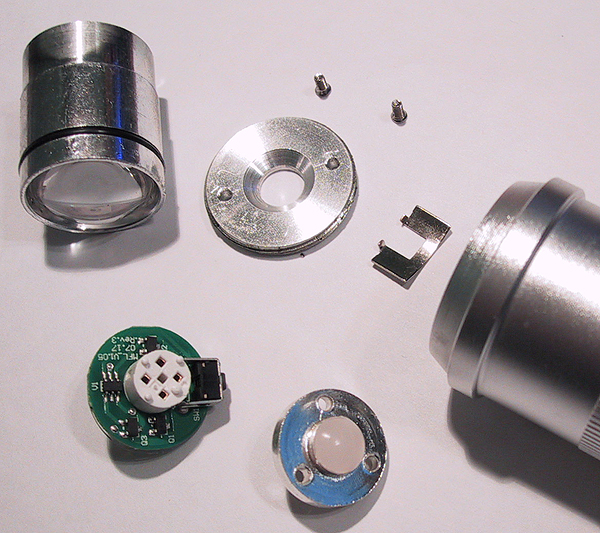
Dekatrons are nice, but they don't put out very much light, and all that fancy pumpkin-carving would go to waste without some fairly beefy internal lighting. The internal lighting I chose was the path of least resistance, an RGB LED module from a gutted Color Shine flashlight. You would be hard pressed to figure out which monstrous Chinese conglomerate bangs out this particular tawdry consumer good, and would be equally hard pressed to find a legitimate use for an RGB flashlight beyond the obvious CSI moments of using blue light to look for blood stains and cat pee. The Color Shine has a handful of redeeming qualities however, its cheap, it's bright, and after unscrewing a couple machined aluminum disks you are left with a compact LED module that will run on 5 volts and change color on command. The manufacturer alleges that the LED in the Color Shine puts out 70 lumens of light, but I am highly skeptical of that number given the tiny ring shaped heatsink on the LED. On the plus side, the LED in the Color Shine driver module is socketed, and it is easy enough to splice a five-volt transformer onto the end and stuff the entire mess into the back of a pumpkin. Granted, the Color Shine module only allows for 10 different colors and a meager selection of flashing options, and there is no easy way to change that without popping the tiny SOT23 microcontroller off of the driver board and reprogramming it. The controller for the Color Shine is a PIC10F200, a well documented processor that can be bought for less than 40 cents from Mouser; a moderately ambitious person with an hour of free time could give this flashlight module a serious brain transplant. If you want to be able to select any color without the hassle of dealing with microscopic SOT23 packages, you will need a module like the BlinkM MaxM, which is a bright LED matrix that is slightly cheaper than gutting a Color Shine and can be set to thousands (or millions) of different colors using an I2C interface. You could also go to the next level and use a painfully bright, eye-burning full color LED array like a Lamina Titan or a LedEngin RGBA emitter, though the sight of innumerable Trick-or-Treaters stumbling drunkenly across your front porch while pawing at their bloody and burned out eye sockets would probably prompt a visit from local law enforcement officials

Here are all of the electronics assembled and ready for insertion. The moist interior of a pumpkin is not exactly an Underwriters Laboratories-approved location for electronics, so I wrapped all of the sensitive components in plastic wrap for protection. The wrap is secured to the tube with rubber bands to keep pumpkin juice from forcing its way up the side of the tube and fouling the electronics.
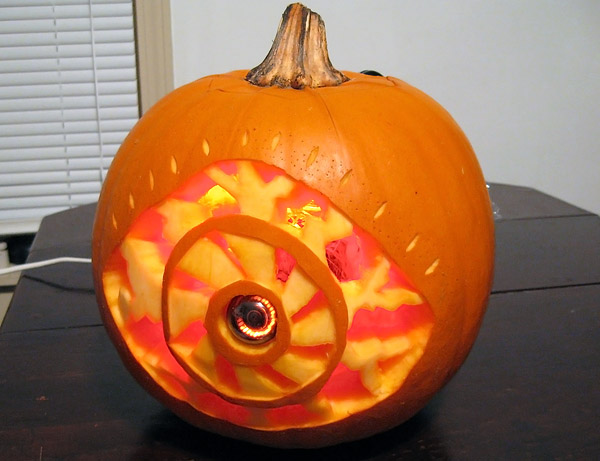
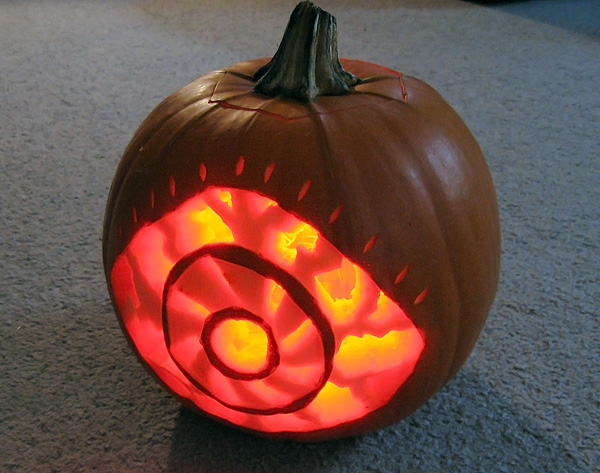
And here is the completed pumpkin with the electronics installed. If you want to make your pumpkin last longer and still look freshly carved on Halloween night, wrap it in plastic wrap and keep it in the fridge until just before the Trick-or-Treaters start to show up.
PIE OF SAURON IN THE NEWS
Halloween Props: Pie of Sauron (Hack A Day)
Hack-o-Lantern 2009 Contest Winners (SparkFun Electronics)
How-To: "Eye of Sauron" swirly vacuum-tube pumpkin (Make Blog)
Sauron Jack-O�-Lantern could be the one squash to rule them all (Geek.com)
Video: Eye of Sauron jack-o'-lantern (Dvice: Live the Future)
| ©2000-2026 Industrial Alchemy. All rights reserved. | Switch to desktop version | Contact | |  |